Quick Start Guide
Q-Consultation offers a lot of flexibility. Whether you want to go fast and quickly see the final result, or would rather dive deeper into the product, we got you covered. For this tutorial, we'll go for the DIY approach and build a project and data structure from scratch.
Before installing Q-Consultation, the following requirements must be installed on your computer:
Node.js: Only Maintenance and LTS versions are supported (
v16,v18andv20).Yarn: The preferred way to manage Yarn is by-project and through Corepack, a tool shipped by default with Node.js. Modern releases of Yarn aren't meant to be installed globally, or from npm.
Enable Corepack, if it isn't already:
corepack enable
If demos are more your thing, we have a video demo:
Step 1: Install dependencies
You will need to clone the repository or download it as a zip archive. Once you have cloned/dowloaded this repo you need to install dependencies running the following command in a terminal:
yarn
Step 2: Register QuickBlox account
Next, you need to have a QuickBlox account. You can sign up here: https://admin.quickblox.com/signup. Feel free to skip this step in case you already have an account.
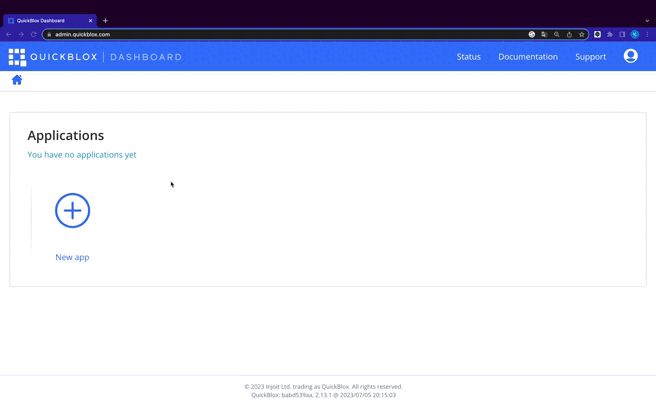
Step 3: Create QuickBlox application
After registering the QuickBlox account, you need to create an application in your QuickBlox admin panel that will allow you to connect the Q-Consultation app to the QuickBlox server. Follow the steps below:
- Log into QuickBlox account (if you are not yet there) https://admin.quickblox.com/signin.
- On the main page, click + sign to add a new application.
- Fill in the required fields: App title and App type, and create app.
Once done, you will be redirected to the Overview page of your newly created application. There, you will find application credentials necessary to connect Q-Consultation application to the QuickBlox server. We will get back to them later.
You can read more about working with applications here: QuickBlox Application
Step 4: Configure application
Now, let’s get back to the application credentials which you saw in the QuickBlox admin panel.
If you have registered your QuickBlox account via Google or GitHub and you do not have a password, you can recover it on the Forgot password page or use another method to configure the application.
In order to work correctly application need to know a set of configs. You can create a configuration file by running this command and following the instructions in the terminal:
yarn init:config
For detailed application configuration information, you can visit the Configuration page. There you will find other ways to configure and a description of all configuration options.
Step 5: Upload Schema
To make online appointments and video records work in the Q-Consultation app, it’s necessary to import an appointment schema file to the QuickBlox admin panel.
If you have registered your QuickBlox account via Google or GitHub and you do not have a password, you can recover it on the Forgot password page or use another method to upload schema into application.
You can add the schema automatically by running this command and following the instructions in the terminal.
yarn init:schema

For details on uploading schema into applications, you can visit the Configuration page. There you will find other ways to upload the schema.
Step 6: Run application
The app is using self-signed certificate since WebRTC supports only HTTPS connection so your web-browser will likely warn you about untrusted certificate. Feel free to skip this warning.
To start the application in a development mode, run the following command in the project folder:
yarn dev
The application will automatically open in the browser after running script.
- Provider: https://localhost:3000
- Client: https://localhost:3001
- API: http://localhost:4000
The page will reload if you make edits.
Step 7: Create users
Provider
There is no registration in the provider's application, so to create a user you need to use the API.
Console method
Enter the following command, replacing the values in angle brackets with the actual data:
- cURL
- HTTPie
curl --request POST \
  --url http://localhost:4000/users/provider \
  --header 'Content-Type: application/json' \
  --data '{
    "full_name": "<Full name>",
    "email": "<Email>",
    "profession": "<Profession>",
    "password": "<Password>"
}'
echo '{
"full_name": "<Full name>",
"email": "<Email>",
"profession": "<Profession>",
"password": "<Password>"
}' | \
http POST http://localhost:4000/users/provider \
Content-Type:application/jsonUsing an HTTP client (such as Postman or Insomnia)
- Open your preferred HTTP client.
- Create a new request with the
POSTmethod. - Set the request URL to
http://localhost:4000/users/provider. - Go to the "Body" tab and select "JSON".
- Add the following form options with the actual data:
full_nameemailprofessionpassword
- Send the request.
In both methods, the request will be sent to the specified URL with the provided data about the provider. Make sure to replace <Full name>, <Email>, <Profession> and <Password> with the actual values you want to use for creating the provider.
Choose the preferred method based on your development environment and tools.
Client
The client application has a self-registration option, so you can either create a client via the web application or via API.
Registration via web application
To create a client, navigate to the registration page by accessing the following URL: https://localhost:3001/signup. Fill in the required information and submit form.

Console method
Enter the following command, replacing the values in angle brackets with the actual data:
- cURL
- HTTPie
curl --request POST \
  --url http://localhost:4000/users/client \
  --header 'Content-Type: application/json' \
  --data '{
    "full_name": "<Full name>",
    "email": "<Email>",
    "password": "<Password>",
    "birthdate": "<Birthdate>",
    "gender": "<Gender>"
}'
echo '{
"full_name": "<Full name>",
"email": "<Email>",
"password": "<Password>",
"birthdate": "<Birthdate>",
"gender": "<Gender>"
}' | \
http POST http://localhost:4000/users/client \
Content-Type:application/jsonUsing an HTTP client (such as Postman or Insomnia)
- Open your preferred HTTP client.
- Create a new request with the
POSTmethod. - Set the request URL to
http://localhost:4000/users/client. - Go to the "Body" tab and select "JSON".
- Add the following form options with the actual data:
full_nameemailpasswordbirthdate(value inYYYY-MM-DDformat)gender(value:maleorfemale)
- Send the request.
In 2 and 3 methods, the request will be sent to the specified URL with the provided data about the client. Make sure to replace <Full name>, <Email>, <Password>, <Birthdate>, and <Gender> with the actual values you want to use for creating the client.
⏩ What to do next?
After you complete the step with running the project in develop mode, Client and Provider apps should be automatically open in your default browser. Now, your Q-Consultation app is ready to be used for your goals.
How to proceed with app integration, you can find detailed instructions here: Development.