Configurations
Configure application
In order to work correctly application need to know a set of configs. You can create a configuration file by running this command and following the instructions in the terminal:
yarn init:config
You can also manually add the ".env" file.
You will need to set the following keys with your credentials:
 # [Required] QuickBlox application Id
 QB_SDK_CONFIG_APP_ID=-1
 # [Required] QuickBlox application Auth Key
 QB_SDK_CONFIG_AUTH_KEY=""
 # [Required] QuickBlox application Auth Secret
 "QB_SDK_CONFIG_AUTH_SECRET=""
 # [Required] QuickBlox account key
 QB_SDK_CONFIG_ACCOUNT_KEY=""
 # Should QuickBlox JS SDK work in debug mode (logging enabled)
 QB_SDK_CONFIG_DEBUG=false
 # QuickBlox JS SDK custom API endpoint
 QB_SDK_CONFIG_ENDPOINT_API="api.quickblox.com"
 # QuickBlox JS SDK custom chat endpoint
 QB_SDK_CONFIG_ENDPOINT_CHAT="chat.quickblox.com"
 # [Optional if you use QuickBlox Basic Plan] QuickBlox JS SDK custom ICE servers
 QB_SDK_CONFIG_ICE_SERVERS=[]
 # QuickBlox account owner email
 QB_ADMIN_EMAIL=""
 # QuickBlox account owner password
 QB_ADMIN_PASSWORD=""
 # [Required if you need integration with your API] Bearer token
 BEARER_TOKEN=""
 # [Required if you need AI features] OpenAI API Key
 OPENAI_API_KEY=""
 # Enable AI Quick answer feature
 AI_QUICK_ANSWER=true
 # Enable AI Suggest provider feature
 AI_SUGGEST_PROVIDER=true
 # Enable AI Record analytics feature
 AI_RECORD_ANALYTICS=true
 # Enable AI Rephrase feature
 AI_REPHRASE=false
 # Enable AI Translate feature
 AI_TRANSLATE=false
 # Chat widget with Assistant for provider
 PROVIDER_ASSISTANT_ID=-1
 # Application name
 APP_NAME="Q-Consultation"
 # Application description
 APP_DESCRIPTION="Q-Consultation"
 # Enable redux-logger
 ENABLE_REDUX_LOGGER=false
 # Display the version
 DISPLAY_VERSION=false
 # URL of the client application. Used by Share Link modal. (If not set, then Share Link will not be displayed in the application)
 CLIENT_APP_URL="https://localhost:3001"
 # URL API.
 SERVER_APP_URL="http://localhost:4000"
 # Enable Guest Client
 ENABLE_GUEST_CLIENT=true
 # Enable History page
 HAS_HISTORY=true
 # Enable Provider page
 HAS_PROVIDER_LIST=true
 # Enable change language
 HAS_CHANGE_LANGUAGE=true
 # Default language (en / ua)
 DEFAULT_LANGUAGE="en"
 # File upload limit in bytes
 FILE_SIZE_LIMIT=10485760
 # Available for upload expansion files
 FILE_EXTENSIONS_WHITELIST="gif jpeg jpg mov mp4 png csv docx pdf pptx txt xls xlsx zip webm heic heif"
[Required] denotes that these variables must be set. Without them, the application will not work correctly.
[Optional if you use QuickBlox Basic Plan] denotes that these variables may not be set only for the QuickBlox Basic Plan, otherwise they are required.
[Required if you need integration with your API] denotes that these variables must be set to enable integration with your API. Enabling this integration will make it easier to work with available queries from your API.
[Required if you need AI features] denotes that these variables must be set to enable and operate the AI feature..
FILE_SIZE_LIMIT is used to initially check the size of uploaded files and display an error if it is exceeded. Modify it according to the limitations of your QuickBlox Plan.
| Basic | Startup | Growth | HIPAA | Enterprise |
|---|---|---|---|---|
| 10 Mb | 25 Mb | 50 Mb | 50 Mb | Contact our sales team |
If you have QuickBlox Basic plan (Shared server), you can skip the following step. In case you have QuickBlox Enterprise plan, to specify custom Ice Servers instead of default ones you can set value for key "QB_SDK_CONFIG_ICE_SERVERS":
[
  {
    "urls": "stun:stun.services.mozilla.com",
    "username": "louis@mozilla.com",
    "credential": "webrtcdemo"
  },
  {
    "urls": ["stun:stun.example.com", "stun:stun-1.example.com"]
  }
]
For more details on the format see RTCIceServer docs.
Upload schema
To make online appointments and video records work in the Q-Consultation app, it’s necessary to import an appointment schema file to the QuickBlox admin panel.
If you have registered your QuickBlox account via Google or GitHub and you do not have a password, you can recover it on the Forgot password page or use another method to upload schema into application.
You can add the schema automatically by running this command and following the instructions in the terminal.
yarn init:schema

You can also add a scheme manually through the Admin Panel.
You will find the schema.yml file in the project directory.
To import this file to the QuickBlox admin panel, follow the steps below:
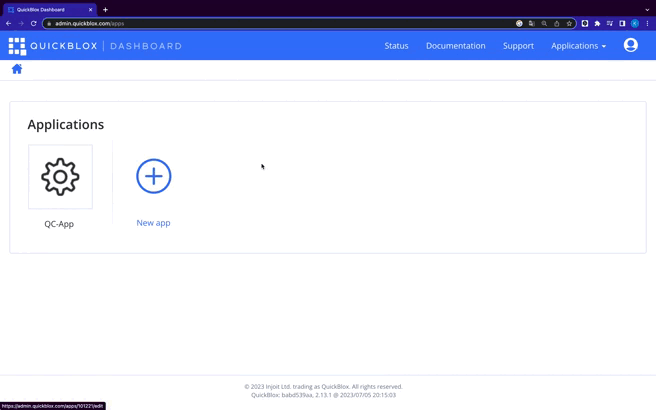
- If you have the QuickBlox application open in the admin panel, go to the tab Custom.
- In the top-right corner, you will find the Import tab.
- There, click Browse for the Import schema File.
- Once the file is added, click Import Schema.
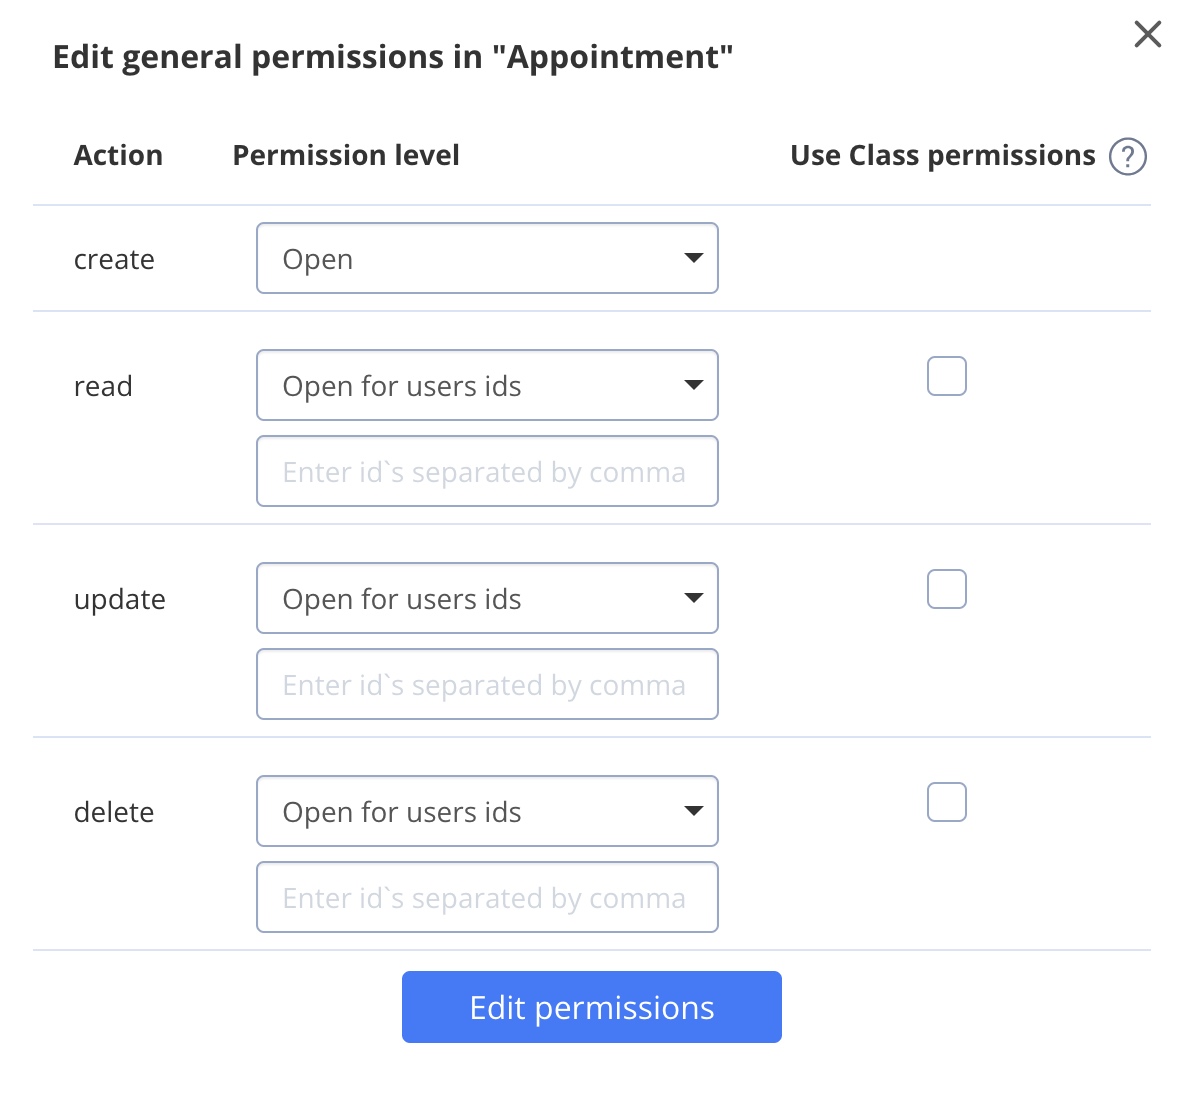
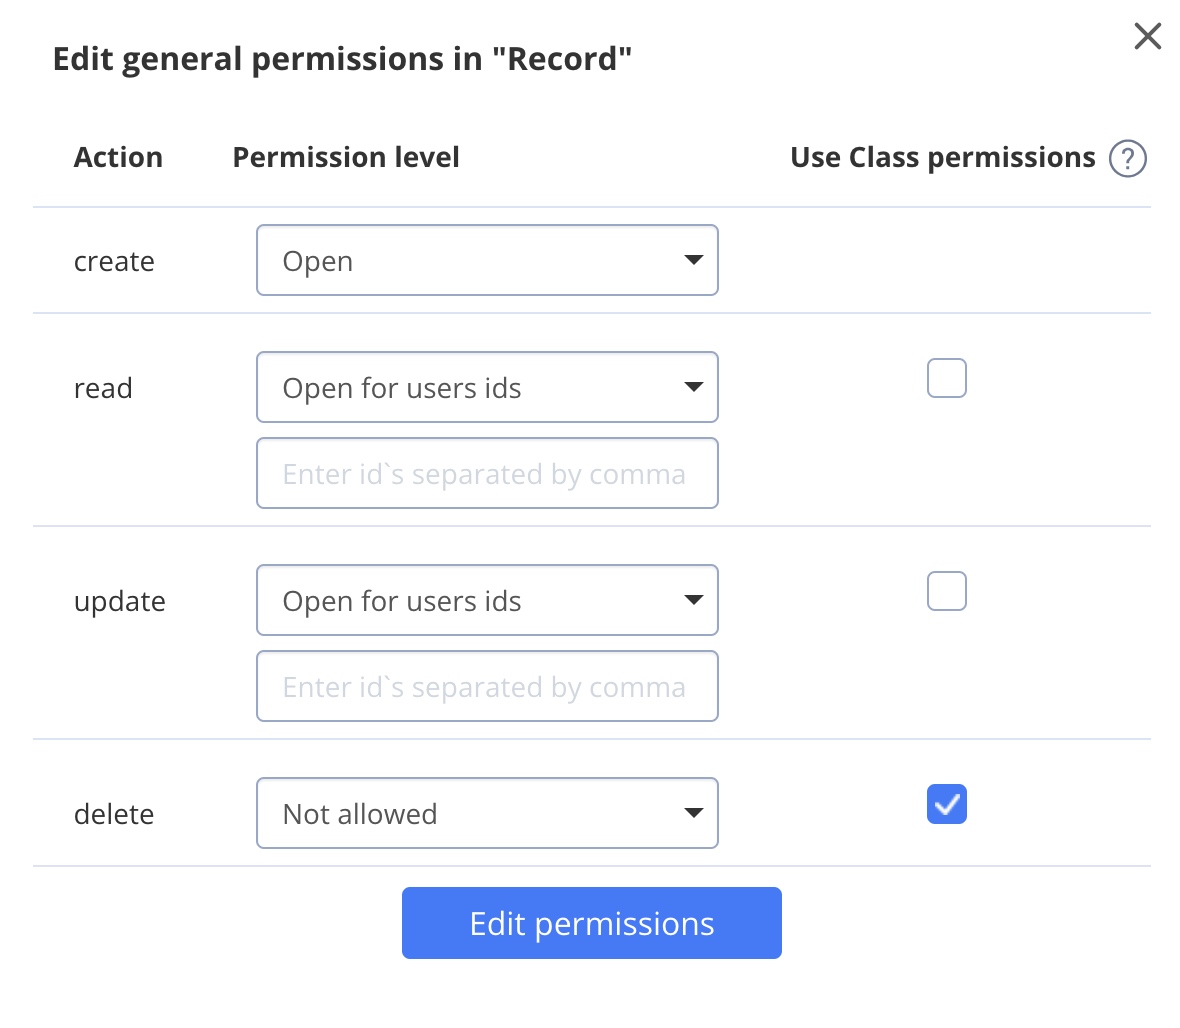
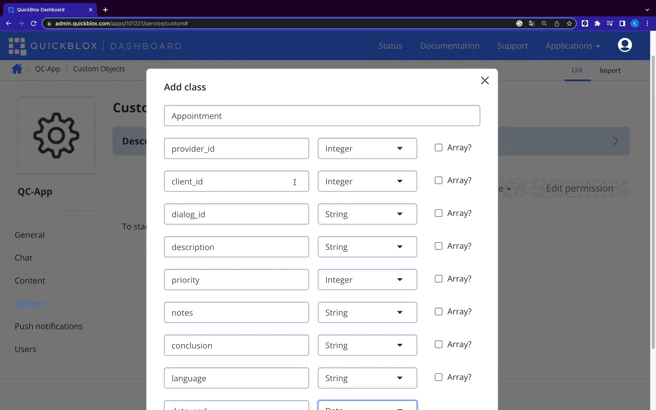
If something goes wrong, you can also manually create a custom class (Appointment and Record) in the way described below:
- In the top-right corner, choose List of the Custom tab.
- There, click Add and choose Add new class from the drop-down menu.
- A modal window will appear where you need to specify the class name and create and create its fields:
Appointment
  provider_id: Integer
  client_id: Integer
  dialog_id: String
  description: String
  priority: Integer
  notes: String
  conclusion: String
  language: String
  date_end: Date
Record
  name: String
  appointment_id: String
  transcription: String_a
  summary: String
  actions: String
  uid: String
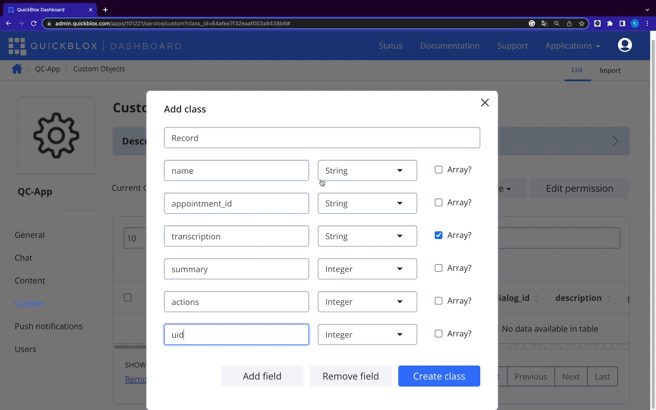
- After all the fields added, click Create class.
- Once done, the modal window will close. You need to choose Edit permission, set the permissions as shown on the below screenshot and click Edit permissions: